28 February 2011

How To Remove Windows Genuine Advantage Notification (WGA) In XP


Windows Genuine Advantage is a anti-piracy program started by Microsoft . It enforces the online validation of some of the Microsoft products. It is automatically installed if windows Automatic updates are enabled. If you goes to the Windows Update site to update your windows Internet Explorer it will ask you for installing this validation tool before you can select the updates from the Microsoft update website.


Note : Its educational purpose only .


What is Do ?
If Windows Genuine Advantage checker  fails to validate your Windows, then it’ll always show you a warning that you may be a victim of software counterfeiting and that your Windows is not genuine. It will show up on your logon screen and make you wait for some seconds. And when you logon, it will just site in your status bar and will keep annoying you. When this tool is installed, it shows up before logging on to the system like the bellow picture.

How to Solve This Problem :
Download Remove WGA and run it. you can download this small software from various portal. Here is link to download this software :   Remove WGA . its a softpedia  link.

18 February 2011

Nice Author Box Widgets For Blogger


I have seen many time that many Wordpress popular blog have a beautiful section to know every that who is the author of this post or blog. I have also seen that some blog have a particular page or text box in footer to show something about the blogger. I think a Author box in post footer make your blog more professional. You may be thinking of that why i dont adding a author box in post footer actually i am thinking about it maybe some days later i will also add a author box in this blog. Any way I strongly believed that  a nice author box under the post footer make your blog more professional and also you add a twitter or facebook link that would be helpfully for increasing follower and fan. So let see how to add a Nice and Beautiful Author Box Widget Under your blog post footer like many popular wordpress blog.   

This is a screen shot of this widget :
About the author widget for blogger
How to Add About The Author Widget In Blogger? See bellow


1.Open your Blogger Dashboard and then go Design and then Edit HTML
2. Find the bellow code. For faster search use Ctrl + F

]]></b:skin>
3. Add the bellow code just before it .
.authbio{
color: #666;
font-weight: normal;
font-size:0.9em;
background: #fff;
border: 1px solid #ccc;
width: 540px;
padding: 15px;
margin-bottom:25px;
}
.authbio a{
text-decoration:underline;
}
img.alignleft {
float:left;
background-color: #c4e3e0;
border:1px solid #c4e3e0;
padding: 5px;
margin-left:2px;
margin-top:0px;
margin-bottom:25px;
margin-right:12px;
}
4. Now search for the following text
                               <data:post.body/>

5. Now add the following code after it 
<div class="authbio">
<div style="float: left;">
<img alt="" src="http://i.imgur.com/VHDtW.jpg" />
</div>
<h1>
About The Author</h1>
Add Your Personal Information here. You can also add some link of you like facebook, twitter or linkdin profile anything you want </div>

** Replace the red color link with your image link.
Save it and See how it look like. I hope you will understand how to add this. If any problem let me know by comment i will try to assist you .

16 February 2011

Revolution Church Premium Blogger Templates Free Download


Revolution Church is Premium Blogger Templates. It is very beautiful theme and it will make your blogger blog more beautiful. As you know for using premium templates you have to pay for it. But when i m looking for a nice blogger themes it seems that the premium themes giving free in many site. By the by  it is a nice theme and take a look how it look like .
Revolution Church Themes For Blogger 
Demo              Download
Some Feature Of This Theme :
  • Hosted images on Photobucket. Free use forever!
  • Favicon support so you can add your own url icon
  • Compressed CSS to speed up your page load times
  • SEO-friendly page titles to help you rank higher in Google
  • Multiple AdSense gadgets already included in prime locations
  • Automatically highlight author comments
  • Embedded JavaScript date code showing current day
  • Fonts and colors support so you can change on the fly
  • YouTube video gadget to show off your favorite video
  • Link list gadget to easily setup your header tabs
  • Recent comments and posts gadgets
  • Integrated Blogger reactions support (new!)
  • Built-in Feedburner RSS feed and email gadget
  • FeedJit live traffic feed gadget
  • Bonus – FREE 125 x 125 ad gadget!
  • Bonus – FREE Step-by-step installation video series

15 February 2011

Another Social Subscribe Section For Blogger


Some days ago i have write another post about Attractive Subscribe Section For Blogger . You can see this for adding social subscription in your blog.  To day i am writing about another Social Subscribe Section for blogger. I think this simple tips make your blogger blog more beautiful. Social subscription section is very important for blogger. Because now a days social network tons of traffic. So let see how it look like and how to add it.   
example of widget


You can add this to your blog in just 2 step. So let see how to add this widgets in blogger blog.
Step 1:
1. Click Design and then Edit HTML from blogger Dashboard
2. Click in the left side box to Expand Widget Templates
3. Find this -    ]]></b:skin> and past the bellow code just before
#subscribe { background:#f3f3f3; width:308px; padding:8px 5px; border:1px solid #e6e6e6; border-bottom:1px solid #e6e6e6; font-size:8px; }
.subscribe_icons { width:286px; margin:0px auto; }
.subscribe_icons li { display:inline; float:left; margin:0px 2px 5px 2px; width:52px; text-align:center; font-size:11px; }
.subscribe_icons a { display:block; padding:40px 0px 2px; -webkit-transition:all .2s ease-out; -moz-transition:all .2s ease-out; color:#444 !important; }
.subscribe_icons a:hover { color:#26b !important; text-decoration:none; -moz-box-shadow:0px 2px 4px hsla(0,0%,0%,.35); -webkit-box-shadow:0px 2px 4px hsla(0,0%,0%,.35); }
.subscribe_icons .subscribe_buzz a { background:url(https://blogger.googleusercontent.com/img/b/R29vZ2xl/AVvXsEiRg5Wi5qg5be9LOimG4LwZ62e6kNDIzbbBHgNeuOfH-oZTgv36EGaTelQGZdfhAIwpXAC6rZ0JftXbKR2-NEWciHugXZJRESw8GokktwjDdTez-bG9qoadrnFsZK7u4HvYErBy_AbqaWs/s1600/buzz.png) center top no-repeat; }
.subscribe_icons .subscribe_twitter a { background:url(https://blogger.googleusercontent.com/img/b/R29vZ2xl/AVvXsEjVC7uCmEv0ZVxyE9_gWkjgfoWZ4MIhBRCIsg9LbEcE0q-cxIrGelwh5L8YZom9_ae6mVqoddAwBIV8q6rVv9o-yKOdsrywgb2A04Z9V76pfbBdvcvTF3qXgKFXppFnpvLbXz8HvDZaJ00/s1600/twitter1.png) center top no-repeat; }
.subscribe_icons .subscribe_facebook a { background:url(https://blogger.googleusercontent.com/img/b/R29vZ2xl/AVvXsEgkulCqr7HXur6WyA62EjZ3UjnfbaVdJV5GTP4W677tywSyIbwSRQyx_5Aa6lsZZmr8_dEEJ1gfJn5PDHw8v_bd3mmKUwLgHEi7q0D-dWghqXrjZmIvgSv-QeUnsHWe5d-5GTQ-ILs4Ohs/s1600/facebook1.png) center top no-repeat; }
.subscribe_icons .subscribe_rss a { background:url(https://blogger.googleusercontent.com/img/b/R29vZ2xl/AVvXsEiKYhpM5XBprj_b3foKRURdkrjyjn7jaiY1KBwD5mAtJMsHu3apm5pZyBHVnMNUBnP0MfNgs5nCCvilyVCaXjUVIxC5qHzWChHiK4ufdBxeTMIg401AFRGU-C8eKhn6pP1_ZXV2BIrH7sk/s1600/rss1.png) center top no-repeat; }
.subscribe_icons .subscribe_email a { background:url(https://blogger.googleusercontent.com/img/b/R29vZ2xl/AVvXsEi7wua7mtb2Cb_40u0Sqyvv_6ey76jyGjFYaFUR-VXb0eNYohjOrX70f3QWw-_jG0nHx2YWzzG_c1bz7RRVkHr6g3GzZMwmF5GomywXsvwscmRzBOo1GWJVWm0ykqPtxamvn8qJpgUAlgU/s1600/email.png) center top no-repeat; }
4. Save it

Step 2:
 1. Now go to the Page Element which you will find in left side of Edit HTML
2. From the right side click Add a Gadget to add a HTML/Javascript box .
3. In the HTML/Javascript box paste the code given bellow :
<div id="subscribe">

<ul class="subscribe_icons">
<li class="subscribe_buzz"><a href="http://google.com/profiles/techwev" rel="nofollow" target="_blank">Buzz</a></li>
<li class="subscribe_twitter"><a href="http://twitter.com/techwev" rel="nofollow" target="_blank">Twitter</a></li>
<li class="subscribe_facebook"><a href="http://www.facebook.com/techwev" rel="nofollow" target="_blank">Facebook</a></li>
<li class="subscribe_rss"><a href="http://feeds.feedburner.com/techwev" rel="nofollow" target="_blank">RSS</a></li>
<li class="subscribe_email"><a href="http://feedburner.google.com/fb/a/mailverify?uri=techwev&amp;loc=en_US" rel="nofollow" target="_blank">Email</a></li>
</ul>

<div class="clear">

</div>
</div>
4. Save it and see how it look like. If anything need about this post pls comment. I will try to help you.

Mashable Style Blogger Themes


MASH themes for blogger is a mashable inspired templates made for blogger platform , This is very nice templates and i think this templates able to give your blogger a nice and beautiful look. Here is the Screen shot of this template and it is free. The templates Mash is made by bloggermint.com

Free Image Hosting
Mash Themes For Blogger

Features
  • Uber cool subscribe widget 
  • Floating social bookmarking widget, as seen in Mashable 
  • Facebook and Twitter share button on every post in the homepage 
  • Top banner ad spot for 460×68 
  • Two column navigation 
  • Numbered page navigation 
  • Trending post bar on the top of each post 
  • Three column footer and much more 
  • Floating Social Bookmark Widget

14 February 2011

Full Free Wordpress Placeholder Themes Collection


Placeholder or Coming Soon or Under Construction Themes for Wordpress are used for upcoming website which is not ready yet and will be ready after some days. Here are some full free and beautiful Placeholder, Coming Soon, Under Construction Themes , upcoming themes collection.

1. Placeholder by woothemes
Demo       Download

Some Features of Placeholder by woothemes :
  •  A countdown timer to let your visitors know when your website will be live. 
  • Social buttons and simple e-mail op-in form to allow users to follow your progress.
  • You can customize basic typography in the theme, and there is full support for Google Fonts in the font selector.
  • The theme includes 5 alternative color styles which you can preview in the demo.
  • And also has styling options for background color and image in the options panel.
2. BEBACK by wordspop
Demo         Download 

Some Feature of BEBACK Themes :
  • Date Launched and Countdown Timer
  • All images cropped and resized automatically to fit the area.
  • Progress Bar
  • Logo Uploaded
  • Text Customizing
3. Under Construction
Demo          Download 
Some Feature of Under Construction Themes by deliciousthemes
  • Theme compatible with WordPress 2.8+
  • Back-end administration panel
  • jQuery Countdown Script
  • E-mail subscription form for Feedburner
  • jQuery Slider
  • Modern and clean web typeface.
  • Tableless design and 100% CSS-based layout.
  • XHTML 1.0 Transitional valid.
  • CSS 2.1 valid.
  • Delivered with source .PSD file.
  • Clean CSS and HTML code.
  • Multi-browser compatibility. Tested under Firefox 3 , Safari 2 , Opera and IE6+.

    13 February 2011

    Skype 5.0 is now available for Mac OS X


    Skype has announced the availability of new version 5.0 of Skype for Mac, disappearing and beta mode, presenting Video Call group as part of package Premium ,As well as an improved interface and new features.
    The video call feature is available as part of the Premium Package that also includes Live chat customer service. You can try free for seven days and then buy either a voucher for one day at a price of 4.01 euros (VAT included) or a monthly subscription price of 6.89 euros per month. New users have a trial period of seven days.

    To start a video call group, only one participant has to be activated seven-day free trial or have been registered for a daily or monthly subscription bonus Skype for Mac 5.0. For all participants receive video, you need to have at least version 5.0 for Mac and Windows.

    How To Change MAC Address in Windows XP


    MAC address (Media Access Control) is the unique number (identifier) which is assigned by network interface hardware manufactures and store them into their hardware. Know about to changing MAC address in your PC is much needed one to hide your online identity, avoid potential of data losses and fight against hackers.
    Here is the step by step instruction for changing MAC address in Windows XP.

    Step 1: At first you have to identify your mac address. For identifying
    1. Open Command Prompt From Accessories .
    2. In Command Prompt window write :
    ipconfig/all
    3. And press enter button then you will find your mac address. Look at the picture the red rounded mark is your MAC address. 

    Step 2: Now its time to change your MAC address. Let see how to change MAC address in windows XP.
    1. Go --> Control Panel --> Network Connection
    2. Select and Right click on your Network Connection and Click Properties a new window will open.
    3. Click and select local area connection properties Configure button as illustrated below.
     4.Select the advanced tab (highlighted in blue) as shown below.
    Then click Network Address and then select the Value . You can see in the box something 000000000000 . Change it with your own mac address and Click OK .Remember that you MAC address is must be 12 digit.

    12 February 2011

    Change Mac Address in Linux


    You can change your Mac address very easily in your Linux PC. You can change your mac address just 2 step. In first step you can be able identify your mac address and second address you can able change your mac address So let see how can we see the mac address and how can we change the mac address.

    Step 1 : Identify the Mac address of Your LAN
    1. Open Terminal window from Accessories .
    2. Enter the command given bellow :
    ifconfig 
    3. Now you are already found your output. In out put you can see something like that eth0, if you use one card then you can see eth0 or if you use more then one card the you can see some thing like that eth1, eth2, eth3 . For example you can see the bellow picture.
    In the terminal output look for something like that : HWaddr 00:01:02:03:04:05 . it is your mac address save it before close the window.

    Step 2: Changing MAC address :
    1. Go to the terminal - Applications > Accessories > Terminal .
    2.Input the bellow command in the window : 
    ifconfig eth0 down
    ifconfig eth0 hw ether 00:01:02:03:04:05
    ifconfig eth0 up
     
    In the second line input your mac address .
    3. In Terminal input the bellow command :
    sudo gedit /etc/network/interfaces
    A new text editor gadget will open. You see the bellow code in the text editor
    auto eth0
    iface eth0 inet static

    address 111.222.333.444
    gateway 555.666.777.888
    netmask 255.255.255.0
    if your connection is not Static then you will see the bellow code :
    auto eth0
    iface eth0 inet dhcp

    address 111.222.333.444
    gateway 555.666.777.888
    netmask 255.255.255.0
    Now enter your mac address in the second line. After entering the mac address in text editor pad your code will be like that :
    auto eth0
    iface eth0 inet static hwaddress ether 01:02:03:04:05:06

    address 111.222.333.444
    gateway 555.666.777.888
    netmask 255.255.255.0
    or
    auto eth0
    iface eth0 inet dhcp hwaddress ether 00:01:02:03:04:05
     Now 00:01:02:03:04:05 will be replaced by your mac address. After changing this 00:01:02:03:04:05 to your mac address save and close the text pad.
    4. Now in Terminal enter the command given bellow:
    sudo /etc/init.d/networking restart
     Now your done. If any cause you want to go back to your old mac address then remove the few extra line you already added in text editor gadit.

    11 February 2011

    Installing New Font In Ubuntu/ Linux Mint


    Installing new font family in Ubantu or Linux Mint not an easy job if you dont know how to install it.For installing font you maybe looking for something like Font folder as windows but you will not find it because windows and linnux are very deference. What ever i think some how linux is better than windows because it is free and Microsoft Windows is not free. You have to pay for it. If you know every thing about Ubuntu or Linux Mint then you always think that Linux is better then Windows. So let see how to add or install new font in Ubuntu or Linux Mint.

    How to Install Font in Ubuntu/ Linux Mint :
    1. Select and Copy the font you want to install.
    2. Close all the window and Press ALT and F2 from the keyboard after press a new window will open. In the window write the bellow code and press Enter  :
    gksudo nautilus
    3. If it want password then give your password. Then a new window will open and the window color will deference from the othee window.
    4. In the new window Browse to go the Font Folder. like  :
    Filesystem>>usr>>share>>fonts 
    5. Paste the font in this folder and close the window.
    6. Now open the terminal and type the code given bellow.
    sudo fc-cache -f fonts
    7. After ending this work ristart the PC and your done. Now you are able to use your new font in Ubuntu or Linux Mint  Pc.

    Social Stamps Free Icon Set


    Marco Kuiper of MarcoFolio has released Social Post Stamps Icon pack with 13 different web2.0 web services icons all placed on post stamps.All icons are available in 3 sizes 32×32, 64×64 and 128×128 px of the following web2.0 services del.icio.us, Designbump, Designfloat, Digg, FlickR, GMail, Google, PayPal, Reddit, RSS, StumbleUpon, Technorati and Twitter.

    Download Social Postal Stamps Icon Set

    10 February 2011

    How to Delete Yahoo! Mail Account


    If you want to delete your Yahoo! mail account then you are at the right place. I am posting a simple process which will help you to terminate your account with Yahoo!. It will permanently delete your account data and settings for your Yahoo! ID, Mail address, and Profile names. It will also delete your account data and settings across Yahoo! including the contents of your HotJobs, Yahoo! Mail, Yahoo! Address Book, Yahoo! GeoCities, Yahoo! Briefcase, and My Yahoo!


    Follow the simple steps :
    Step 1 :Log in to your Yahoo! e-mail account
    Step 2: Make sure you have username and password of the account you want to delete.
    Step 3: Now Visit the Terminate Your Yahoo! Account page.
    Step 4: You will be asked again to enter your password. Enter your password and click “Terminate this Account” Step 5: You are done!
    Now your account deletion process will be notified to Yahoo team and it will be deactivated and then deleted from there user registration database in approximately 90 days!
    Screenshots :


    Note : If you don’t want to loose the information which is in Yahoo! account then make sure you back up all you vital information before completing all these steps.

    08 February 2011

    Create New Facebook Profile Layout Using Tagged Photo


    Not many day some days ago facebook release there new layout. One  feature is very amazing that Photostream which is allowed to show your very recent tagged photo in header of your profile page. So you can give your facebook profile new look just using a tagged photo hack.

    Let see How to Create New Facebook Profile Layout Using Tagged Photo:
    1. FBCROP
    FBcrop  is an online tool that duplicates the effect of the facebook profile hack in 3 easy steps. It gives a higher level of customizability compared to other methods currently available and works by directly uploading to your facebook account. Link

    2. PICCUT
    PicCut  is an useful  online tool that allows you to upload large picture and it will automatically slice up the image according to the size requirements of the facebook new profile photo image trick.

    An useful addition to this tool is it lets you select the no. of lines in your profile bio. If your profile bio is 1-2 lined then the alignment of the photostream thumbnails is non proper making it look mis-aligned

    07 February 2011

    5 Best Game Themes For Blogger


    Today i searching over the internet to find some blogger themes for gaming blog. I dont see any good collection about gaming theme. Now i am writing about 5 Best gaming blogger themes . I hope can my post will help them who want to make a blog for gaming in blogger. And the 5 best blogger themes are bellow.

    Number 1: GameBoard Blogger Template

    Something about this template : 1 Sidebar, 2 Column, Adapted from Wordpress, Featured Section, Fixed width, Header Banner, Magazine, Pbtemplates, Right Sidebar, Slider, Top Navigation Bar, Web 2.0, White, adsense ready, seo ready.
    Demo and Download

    Number 2: Games Hero Blogger Template
    Something about this template : 1 Sidebar, 2 Column, Adapted from Wordpress, Featured Section, Fixed width, Header Banner, Magazine, Pbtemplates, Right Sidebar, Slider, Top Navigation Bar, Web 2.0, White, adsense ready, seo ready.
    Demo and Download

    Number 3: MMOStar Blogger Template


    Something about this template : 1 Sidebar, 2 Column, Adapted from Wordpress, Featured Section, Fixed width, Header Banner, Magazine, Pbtemplates, Right Sidebar, Slider, Top Navigation Bar, Web 2.0, White, adsense ready, seo ready.
    Demo and Download

    Number 4: iVideoGames Blogger Template

    Something about this template : 1 Sidebar, 2 Column, Adapted from Wordpress, Featured Section, Fixed width, Header Banner, Magazine, Pbtemplates, Right Sidebar, Slider, Top Navigation Bar, Web 2.0, White, adsense ready, seo ready.
    Demo and Download

    Number 5: New Games Blogger Template

    Something about this template : 1 Sidebar, 2 Column, Adapted from Wordpress, Featured Section, Fixed width, Header Banner, Magazine, Pbtemplates, Right Sidebar, Slider, Top Navigation Bar, Web 2.0, White, adsense ready, seo ready.
    Demo and Download

    Attractive Subscribe Section For Blogger


    In this article i am going to explain how to add a attractive subscribe section in your blogger blog. This subscribe section is included Feedburner feed and Email subscriptions, Twitter and Digg follow option. So let see how to add this social subscribe section in blogger blog.
    Step 1 :

             1. Log in to your dashboard--> Layout - -> Edit HTML
             2. Click on "Expand Widget Templates"
             3. Find this Code: You can use browser search function by just pressing Ctrl+F and Use Ctrl+C to Copy and Ctrl+V to Past.
             4.Now add this code given bellow before  ]]></b:skin> and Save it after done.

    .subbox{width:280px;border:0 solid #141414;overflow:hidden}
    .rssbox{background:#f7f6f6;border:1px solid #ccd1d7;padding:5px 10px;margin:10px 0 0 0;-moz-border-radius:10px;-khtml-border-radius:10px;-webkit-border-radius:10px;border-radius:10px;width:105px}
    .rssbox:hover{border:1px solid #92aed1}
    .rssbox a{color:#7c8a9b;text-transform:uppercase;text-decoration:none;font:bold 12px Arial,Helvetica,Sans-serif}
    .rssbox a:hover{color:#7c8a9b;text-decoration:underline}
    .emailsbox{background:#f7f6f6;border:1px solid #ccd1d7;padding:5px 10px;margin:10px 0 0 0;-moz-border-radius:10px;-khtml-border-radius:10px;-webkit-border-radius:10px;border-radius:10px;width:105px}
    .emailsbox:hover{border:1px solid #92aed1}
    .emailsbox a{color:#7c8a9b;text-transform:uppercase;text-decoration:none;font:bold 12px Arial,Helvetica,Sans-serif}
    .emailsbox a:hover{color:#7c8a9b;text-decoration:underline}
    .twitterbox{background:#f7f6f6;border:1px solid #ccd1d7;padding:5px 10px;margin:10px 0 0 0;-moz-border-radius:10px;-khtml-border-radius:10px;-webkit-border-radius:10px;border-radius:10px;width:105px}
    .twitterbox:hover{border:1px solid #92aed1}
    .twitterbox a{color:#7c8a9b;text-transform:uppercase;text-decoration:none;font:bold 12px Arial,Helvetica,Sans-serif}
    .twitterbox a:hover{color:#7c8a9b;text-decoration:underline}
    .diggbox{background:#f7f6f6;border:1px solid #ccd1d7;padding:5px 10px;margin:10px 0 0 0;-moz-border-radius:10px;-khtml-border-radius:10px;-webkit-border-radius:10px;border-radius:10px;width:105px}
    .diggbox:hover{border:1px solid #92aed1}
    .diggbox a{color:#7c8a9b;text-transform:uppercase;text-decoration:none;font:bold 12px Arial,Helvetica,Sans-serif}
    .diggbox a:hover{color:#7c8a9b;text-decoration:underline}


    Step 2: Add a HTML/Javascript in your blogger blog right side bar from the Page Element Under Design and past the bellow code in this box and save it.
    <table><tr>
    <td><div class="rssbox">
    <a href="http://feeds.feedburner.com/techwev" target="_blank" rel="nofollow"><img src="https://blogger.googleusercontent.com/img/b/R29vZ2xl/AVvXsEjkN-giH58_CAMEAe2YXsdtrRAdk3QvCs6xOvGuu1v4mPDgV2rEUurBV5N_EtdqJA5yfmPFCMXQySya_N9lMU9IK0UOIUUyiy-SFql-bPdspTkBvrasmDvVGeh7c1RkoX350KaLULnIA_pP/"  alt="RSS Feed" title="RSS Feed" style="vertical-align:middle; margin-right: 5px;border:none;"  /></a><a href="http://feeds.feedburner.com/techwev" target="_blank" rel="nofollow">RSS Feed</a>
    </div></td>
    <td><div class="emailsbox">
    <a href="http://feedburner.google.com/fb/a/mailverify?uri=
    techwev" target="_blank" rel="nofollow"><img src="https://blogger.googleusercontent.com/img/b/R29vZ2xl/AVvXsEiRBkXTRjdwHK696HRAp3N9UD2hlklF997im6Mw90GCOo2pd5PeCFjmOlx3C15W55IcpgWnaqk_m-MkW9J0FF3oelHguFI7OvuFi6kesvcPQs7W-2xvRY7T9K6yXMpvbDr1y88XdoQ5ebxv/"  alt="EMail Feed" title="EMail Feed" style="vertical-align:middle; margin-right: 5px;border:none;"  /></a><a href="http://feedburner.google.com/fb/a/mailverify?uri=techwev" target="_blank" rel="nofollow">EMail Feed</a>
    </div></td>
    </tr><tr>
    <td><div class="twitterbox">
    <a href="http://twitter.com/
    techwev" target="_blank" rel="nofollow"><img src="https://blogger.googleusercontent.com/img/b/R29vZ2xl/AVvXsEggblb7QDhPTXmxRCOTZgpo1yRyw71jzKKQDkbym83VMwVGIyfWs70Wfc-vUbHqjeNRpnpz0Y3i8LfAo2F1WUdp-1yA7vOUrWnHTCvcIMGYN-ho6kP-qToUX2v6nf7MQAxOZDQ85GNPSGjU/"  alt="Twitter" title="Twitter" style="vertical-align:middle; margin-right: 5px;border:none;"  /></a><a href="http://twitter.com/techwev" target="_blank" rel="nofollow">Follow Twitter</a>
    </div></td>
    <td><div class="diggbox">
    <a href="http://www.digg.com/techwebd" target="_blank" rel="nofollow"><img src="http://img209.imageshack.us/img209/2774/digg.jpg"  alt="Digg" title="Follow On Digg" style="vertical-align:middle; margin-right: 5px;border:none;"  /></a><a href="http://www.Digg.com/techwebd" target="_blank" rel="nofollow">Follow On Digg</a>
    </div></td>
    </tr></table>
     
    *** Replace the red text with your id and if any problem just let me know that via comment .

    04 February 2011

    How To Delete Facebook Account Permanently


    Facebook are now most used and number one social network in the world. Facebook have lot of user. As far as i know many people having trouble in facebook for many reason. If you want to delete your facebook you can't find anything to delete your account except Deactivate Account in Account Setting. If you deactivate your account in facebook all of your data, picture and other information still be saved there database. If you want to delete your account permanently and never want to come back then you have to delete your account.  I think my post will be helpful for them who wants to Delete their account.

    Let see how to Delete Facebook Account Permanently :
    Step 1 : Log in your facebook account which you want to delete permanently.

    Step 2 : Follow the link below to delete your account
    http://www.facebook.com/help/contact.php?show_form=delete_account

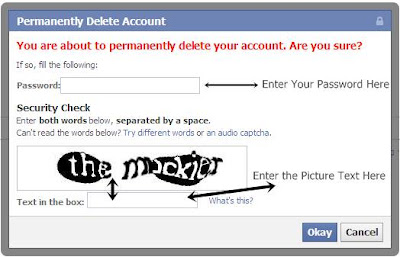
    Step 3: Above link will bring you the following page :

     
    Step 4: After Clicking Submit Button a new page will open like the bellow picture :


    Step 4: Click Okay and you are done .

    Note : Don't to need delete individual photos, comments, messages or items from your profile or anywhere else on Facebook. Every thing will be deleted with you account.

    03 February 2011

    Disable Write Access To USB Port in Windows XP


     Disabling Write access to USB Port can block many virus, spam, malware, trojon. Because when some one plug a pen drive or other storage device in pc the virus, trojon automatically make copy of then to your pc. It can be prevent if you disable write access of your pc. Because in this case a pen drove or storage device only can find read access not write access . In my previous post i write about How to disable USB port on windows Xp. This tips also windows xp. 


    How to Disable write access To USB Port:
    1. Click Start and then click Run write regedit and press enter to run Registry Editor.
    2. Navigate to the following registry key:
            HKEY_LOCAL_MACHINE\SYSTEM\CurrentControlSet\Control
    3. Create a New Key named as StorageDevicePolicies.
    4. Highlight StorageDevicePolicies, and then create a New DWORD (32-bit) Value named as WriteProtect.
    5. Double click on WriteProtect, and set its value data to 1. Example bellow:
    You are done. If you dont want this Just Undo It.

    How to Hide Hard Disk Partition in Windows XP/Vista/7


    You may need to hide your hard disk partition or drive from your pc. I wish this tips can help mane more people who wants to hide there Drive from there Pc because of many reason. 


    So Let see How to Hide Hard Disk Partition in Windows XP, Windows Vista and Windows 7.


    You can hide your partition using NoDrive Manager Software. You can also do this manual but i think this maybe hard for most of the people who wants to hide there Drive from there Windows , Windows XP and Windows Vista.
    NoDrive Manager
      ** To Hide your Drive select it from NoDrive Manager and Then Click Write current settings to the registry .
      ** To Unhide The Hidden Drive Select it and Then Click Write current settings to the registry .
    Download The Software From This Link : http://nodrvman.sourceforge.net/

    How To Disable USB Port On Windows XP


    Disabling USB Port can save your pc from virus attack .  Because now a days most of the virus and trojan, malware and other risk weare travel deference via Pen drive, memory card and other storage device that have to use by usb port. In office disabling USB port is not a good idea because printer, scanner and many more things have to use. So the good idea is disable write access to USB port so that data files cannot be written to the storage device.  What ever I m writing about How to Disable USB port in windows Xp. So Let see how to do that.


    Step 1 : Disable USB Port in Windows XP
                 1. Click Start, and then click Run. In the box type regedit, and then click OK.
                 2. Locate and then click the following registry key:
    HKEY_LOCAL_MACHINE\SYSTEM\CurrentControlSet\Services\USBSTOR
              In the display box Double Click Start and In the Value data box, type 4 default given 3 and then click OK.
                3. Exit Registry Editor. You are Done. You can see the Picture Bellow.
    Step 2 : Re-enable Disable USB Port in Windows XP
                 1. Click Start, and then click Run. In the box type regedit, and then click OK.
                 2. Locate and then click the following registry key:
    HKEY_LOCAL_MACHINE\SYSTEM\CurrentControlSet\Services\USBSTOR
              In the display box Double Click Start and In the Value data box, type 3 and then click OK.
                3. Exit Registry Editor.

    Note : Tested in Windows XP SP2 and SP3

    01 February 2011

    Age Of Empire 3 Cheat Code


    Age of Empires 3  is a real-time strategy  game developed by Microsoft Corporation's Ensemble Studios and published by Microsoft Game Studios.
     Here is The cheat code of Age Of Empire 3 or AoE III.
    Cheat Code Of Age Of Empire 3 :
    Hit Enter  Key to enter to activate cheat code option. Cheat code are given Bellow.

    Cheat                                    Result
    Medium Rare Please Gives                 10,000 food
    George Crushington                       Gives 10,000 wood
    Give me liberty or give me coin Gives    10,000 coin
    Nova & Orion                             10,000 XP
    Speed always wins                        100x gather/build rates
    Sooo Good                                when you get killed by Musketeers
    Ya gotta make do with what ya got        Spawns the Mediocre Bombard at your Home City gather point
    this is too hard                         Win single player Mission
    tuck tuck tuck                           Spawns a big red monster truck that can run over anything
    Shiver me Timpers!                       Destroys all the enemy boats on the map

    A recent study indicated that 100% of herdables are obese   Fattens all animals on map

    Twitter Delicious Facebook Digg Stumbleupon Favorites More